Welcome to the Tent Instructions Manual! This guide provides essential steps for safe and proper tent assembly. Read carefully to ensure a secure setup and enjoyable camping experience.
Importance of Following Tent Setup Guidelines
Following tent setup guidelines ensures safety, prevents damage, and guarantees proper structural integrity. Incorrect assembly can lead to collapses or weather exposure, risking personal safety and equipment durability. Adhering to instructions helps maintain the tent’s waterproofing, stability, and functionality. Proper staking and anchoring prevent wind damage, while correct pole assembly ensures the tent stands upright. Ignoring guidelines may void warranties and compromise performance. Always prioritize careful setup to enjoy a secure and comfortable camping experience.
Key Components of a Tent Manual
A comprehensive tent manual includes step-by-step setup instructions, safety guidelines, and maintenance tips. It typically covers pole assembly, fabric attachment, and staking techniques. Clear diagrams and images are often provided to simplify complex steps. The manual also outlines weatherproofing checks and structural integrity verification. Safety precautions, such as avoiding sharp objects and proper anchoring, are emphasized to prevent damage and ensure stability. By following the manual, users can achieve a secure and weather-tight setup, enhancing their camping experience.

Choosing the Right Tent for Your Needs
Selecting the ideal tent involves considering its type, size, and capacity. Ensure it suits your camping style, weather conditions, and group size for optimal comfort and durability.
Understanding Tent Types (Camping, Backpacking, Family Tents)
Tents are categorized into camping, backpacking, and family tents, each designed for specific needs. Camping tents are versatile for general use, while backpacking tents prioritize lightweight materials for hikers. Family tents are spacious, often featuring multiple rooms for comfort. Consider factors like weight, durability, and space when selecting a tent type. Choose based on your activity, group size, and preferences to ensure the best fit for your outdoor adventures.
Selecting the Correct Size and Capacity
Selecting the right tent size ensures comfort and functionality. Consider the number of people using the tent and the gear you’ll store inside; A tent’s floor length, width, and peak height impact livability. Capacity ratings often assume close quarters, so choose a tent rated for one more person than your group size for added comfort. Seasonal use may also influence size, as winter camping often requires more interior space for layers and gear. Proper size selection enhances your camping experience and ensures adequate shelter for all occupants.
Pre-Setup Instructions
Pre-setup involves unpacking, verifying all parts, and ensuring tools are ready. Familiarize yourself with the site and prepare the area for tent assembly.
Unpacking and Inventory Check
Begin by carefully unpacking the tent from its storage bag. Lay out all components, including poles, stakes, fabric, and rainfly. Check each item against the manual’s list to ensure nothing is missing or damaged. Organize parts to avoid confusion during assembly. Inspect poles for bends or breaks and verify fabric integrity. Address any issues immediately to prevent setup delays. This step ensures a smooth and successful assembly process. Proper organization now saves time and frustration later. Always double-check your inventory before proceeding.
Reading the Manual Before Starting
Before assembling your tent, thoroughly read the manual to understand the process. Familiarize yourself with diagrams, instructions, and safety tips. Identify all components and their functions to avoid confusion. Pay attention to specific features like color-coded poles or unique attachment points. Reading the manual ensures you follow the correct sequence, preventing mistakes and potential damage. Even experienced campers should review the guide, as each tent may have unique assembly steps. Taking a few minutes to read the manual saves time and frustration during setup.

Site Selection and Preparation
Select a flat, dry area away from hazards. Clear debris and rocks to ensure a stable base for your tent. Ensure the ground is firm and even.
Choosing a Flat and Clear Area
Selecting a flat and clear area is crucial for proper tent setup. A level surface ensures even weight distribution, preventing water pooling and structural instability. Avoid slopes or uneven terrain, as they can compromise stability and comfort. Clear the site of rocks, branches, and debris to prevent damage to the tent floor. Additionally, choose a spot free from standing water or low-lying areas prone to flooding. Ensure the area is firm and dry for optimal tent performance and safety. A well-chosen site enhances both functionality and comfort during your camping experience.
Removing Sharp Objects and Debris
Before setting up your tent, thoroughly clear the area of sharp objects and debris. Rocks, branches, and metal fragments can damage the tent floor or poles. Use gloves and tools to safely remove any hazardous materials. Create a buffer zone by sweeping away leaves and twigs. Check for small items like thorns or glass that could puncture the fabric. Once cleared, inspect the ground for unevenness or remaining obstacles. This step ensures a safer and more durable tent setup, protecting both the tent and its occupants from potential damage or injury.
Tent Assembly Process
Organize poles, fabric, and hardware. Follow the manual for correct frame assembly. Attach poles to corners and stand upright. Secure fabric evenly, ensuring alignment and tightness for stability. Properly connect all components to achieve a sturdy structure.
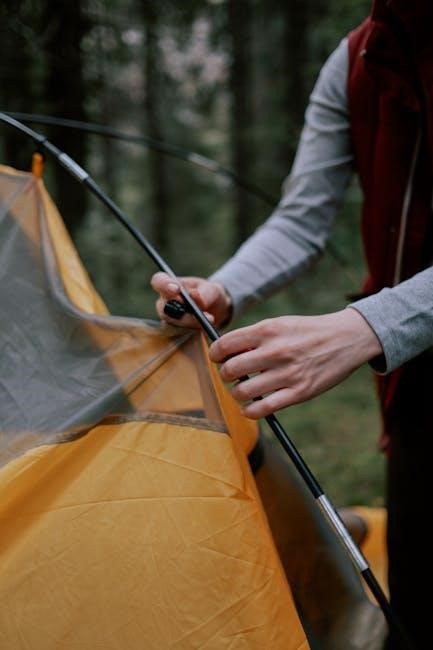
Step-by-Step Pole Assembly
Begin by identifying and organizing the poles and connectors. Match color-coded poles to corresponding connectors for correct assembly. Attach the longest poles first, securing them into corner hubs. Gently twist and click each pole into place, ensuring a snug fit. Use the elastic cord inside the poles to guide the assembly. Stand the structure upright to check stability and alignment. Tighten all connections firmly. Double-check that all poles are fully extended and properly seated in their sockets for a sturdy frame.
Attaching the Tent Fabric to the Frame
Locate the tent fabric attachment points on the frame. Clip or hook the fabric to the poles, starting from the bottom and working upward. Ensure all corners are securely fastened. Use color-coded tabs or labels to align the fabric correctly. Gently pull the fabric taut to remove wrinkles and sag. Attach any remaining clips or hooks, ensuring a snug fit. Avoid over-tightening, as this may damage the fabric or frame. Double-check all connections for proper alignment and stability before proceeding.
Securing the Tent with Stakes and Guy Lines
Drive stakes into the ground at a 45-degree angle through the tent’s stake loops, ensuring they’re firmly seated. For guy lines, attach them to the tent loops or hooks and stake them outward to create tension. Tighten each line evenly to avoid uneven stress on the fabric. Check all stakes and lines for tightness, especially at corners and high-stress points. Repeat this process until the tent stands firmly upright and the fabric is taut. Ensure all connections are secure to withstand wind and weather conditions.
Staking and Anchoring the Tent
Secure the tent by driving stakes into the ground at a 45-degree angle through stake loops. Use guy lines to tighten the tent fabric and ensure stability.
Proper Staking Techniques
Drive stakes into the ground at a 45-degree angle through the loops to ensure the tent is securely anchored. Use a rubber mallet to avoid damaging the stakes or fabric; For optimal stability, stake the tent in a star pattern, starting from the corners and working inward. Tighten guy lines evenly to maintain tension and prevent sagging. For larger tents, use longer stakes and additional guy lines to reinforce the structure. Always check the tent’s alignment and adjust stakes as needed to ensure a tight, even fit.
Tightening the Rainfly and Guaranteeing Structural Integrity
After attaching the rainfly, ensure it is tightly secured to the tent frame using clips, hooks, or Velcro tabs. Adjust the rainfly evenly to avoid wrinkles or sagging, as this can compromise water resistance. Use guy lines to pull the rainfly taut and stake them firmly into the ground. Check all connections and tighten as needed to maintain structural integrity. Ensure no loose fabric remains, as wind or rain could cause damage. Properly tightened, the rainfly will protect the tent and enhance its stability in various weather conditions.

Door and Window Installation
Attach doors and windows securely to the tent frame using hooks, tabs, or Velcro. Ensure proper alignment for smooth zipping and closure. Use provided straps or ties to fasten them tightly, ensuring weatherproofing and ease of access.
Attaching Doors and Windows to the Tent Frame
Begin by aligning door and window panels with their designated attachment points on the tent frame. Use hooks, tabs, or Velcro strips to secure them firmly. Ensure all connections are snug to maintain structural integrity. For windows, verify that they are properly seated in their sleeves or pockets before fastening. Doors should be attached using the provided straps or ties, ensuring they hang evenly. Refer to your manual for specific attachment points to avoid misalignment or damage. Handle zippers carefully to prevent tearing during installation.
Ensuring Proper Alignment and Closure
After attaching doors and windows, check their alignment with the tent frame to ensure proper fit. Verify that zippers operate smoothly and closures are secure. Adjust the frame slightly if needed to achieve even alignment. Make sure all Velcro straps or hooks are tightly fastened to prevent gaps. Test door and window functionality by opening and closing them repeatedly. Proper alignment ensures weather tightness and prevents strain on the tent fabric. Double-check all connections to guarantee a snug and secure fit for optimal performance and durability.

Final Adjustments and Checks
Tighten all connections and poles to ensure stability. Verify weatherproofing by inspecting seams and checking for any gaps. Make sure the tent stands firmly and evenly.
Tightening All Connections and Poles
Check all poles and connections for looseness. Use the provided wrench or tool to tighten any bolts or clips securely. Ensure all joints are snug and aligned properly. Avoid overtightening, as this may damage the tent frame. If a section feels unstable, loosen and reattach it carefully. Repeat this process for all poles and connections to guarantee the tent’s structural integrity. This step ensures the tent remains stable and withstands environmental conditions effectively while camping. Proper tightening prevents sway and potential collapse.
Verifying Weatherproofing and Stability
After assembling the tent, inspect all seams and joints for gaps or leaks. Ensure the rainfly is securely attached and evenly spread. Check that all guy lines are tightly fastened to maintain stability. Test the tent’s resistance to wind by gently pulling it. Verify that stakes are deeply anchored and evenly spaced. Ensure no fabric is sagging or loose, as this can compromise weatherproofing. Make adjustments if necessary to guarantee the tent remains stable and watertight in various weather conditions. This step is crucial for ensuring a safe and dry camping experience.

Care and Maintenance
Regular tent maintenance ensures longevity. Clean and dry thoroughly before storage. Avoid harsh chemicals. Inspect for damage and repair promptly. Proper care enhances durability and performance.
Cleaning and Drying the Tent
Regular cleaning and drying are essential for maintaining your tent’s condition. Use a soft brush to remove dirt and debris. For stains, apply a mild soap solution with a clean cloth. Avoid harsh chemicals or abrasive cleaners, as they may damage the fabric. Rinse thoroughly and allow the tent to air dry completely before storage. Never fold or store a damp tent, as it can lead to mold and mildew. Proper drying ensures the tent remains waterproof and ready for future use.
Storage Best Practices
Store your tent in a cool, dry place to prevent moisture buildup. Avoid basements or attics prone to humidity. Never leave the tent in its stuff sack for extended periods, as this can cause damage; Instead, store it loosely in a large, breathable bag to maintain its shape. Ensure the tent is completely dry and clean before storage to prevent mildew. Avoid folding the tent in the same way repeatedly, as this can create permanent creases. Check the storage area periodically for pests or mice that might damage the fabric.

Safety Instructions
Always follow the tent manual to ensure safe setup. Use proper tools and wear gloves to avoid injuries. Keep flammable items away from the tent. Check for damage before setup and avoid overloading the structure. Ensure children and pets are supervised during assembly. Never set up a tent near open flames or sparks. Be aware of weather conditions that may affect stability.
General Safety Guidelines for Tent Setup
Always follow the tent manual instructions carefully to ensure a safe setup. Wear protective gloves and eyewear when handling poles and stakes. Avoid setting up near open flames, power lines, or standing water. Check the tent for damage before use and ensure all parts are securely connected. Keep children and pets supervised during assembly. Never exceed the tent’s capacity, and avoid setting up in extreme weather conditions. Ensure proper ventilation to prevent condensation buildup and maintain structural stability.
Weather-Related Precautions (Wind, Rain, Snow)
Assess weather conditions before setting up your tent. In windy areas, secure the tent with extra stakes and guy lines to prevent damage. For rain, ensure the rainfly is properly attached and avoid water pooling on the fabric. In snowy conditions, clear snow from the tent regularly to prevent collapse and reinforce the structure with additional support. Always follow the manufacturer’s guidelines for weather-specific setups and avoid camping in extreme weather when possible.
Fire Safety and Prohibited Items Inside the Tent
Never bring open flames, candles, or cigarettes inside the tent, as they pose a significant fire hazard. Use battery-operated lights instead of lanterns with flames. Keep cooking equipment and camping stoves outside the tent. Prohibit the use of heaters, lanterns, or sparks-producing items inside. Always ensure flammable liquids and aerosols are stored away from the tent. Keep a fire extinguisher nearby and follow local fire safety guidelines. Avoid overloading the tent with items that could ignite or obstruct escape routes in case of an emergency.

Troubleshooting Common Issues
Identify common tent issues like broken poles, torn fabric, or loose connections. Refer to the manual for repair guidance or contact the manufacturer for assistance.
Identifying and Repairing Damage
Inspect the tent for damage like broken poles, torn fabric, or bent connectors. For minor tears, use a repair patch kit. Replace damaged poles or connectors with spares. Ensure all repairs are secure before use. For major damage, contact the manufacturer for professional assistance. Regularly checking and addressing issues prevents further deterioration. Always follow the manual’s repair guidelines for optimal results. Proper maintenance ensures the tent remains durable and weatherproof for future camping trips. Addressing damage promptly enhances safety and extends the tent’s lifespan;
Resolving Assembly Problems
If assembly issues arise, start by carefully reviewing the manual to ensure all steps are followed correctly. Check that poles are properly labeled and matched to their corresponding sleeves. If a pole section doesn’t fit, try reversing it or aligning it differently. Consult the troubleshooting section for specific guidance. If problems persist, contact customer support for assistance. Keep spare parts handy to address unexpected issues. Patience and methodical retracing of steps often resolve assembly challenges effectively. Ensure all connections are secure before moving forward.
Seasonal Use and Adaptations
Adapt your tent setup for different seasons by using snow stakes in winter and lightweight materials in summer. Adjust guy lines for windy conditions and ensure UV protection in sunny weather.
Using the Tent in Different Weather Conditions
Adjust your tent setup based on weather forecasts. For rainy conditions, ensure the rainfly is securely attached and seams are tightly sealed. In windy environments, stake the tent firmly and use guy lines to maintain stability. During snowy weather, clear snow from the tent roof regularly to prevent collapse and use snow stakes for extra grip. In sunny conditions, position the tent to avoid direct sunlight and use UV-resistant materials to prevent fabric degradation. Always choose the right accessories for the season to ensure safety and comfort.
Winter and Summer Camping Adjustments
For winter camping, use a four-season tent with a sturdy frame and heavy-duty stakes to withstand snow and wind. Apply thermal insulation pads inside the tent and clear snow from the roof regularly. In summer, opt for lightweight, breathable tents with mesh panels for ventilation. Use UV-resistant materials to protect against sunlight and position the tent in shaded areas to reduce heat exposure. Seasonal adjustments ensure optimal performance and comfort in extreme weather conditions.

Additional Features and Accessories
Tents often include vestibules, awnings, gear lofts, and air vents to enhance functionality. These accessories improve storage, shade, organization, and ventilation for a better camping experience.
Using Tent Stakes, Guy Lines, and Pegs
Tent stakes, guy lines, and pegs are essential for securing your tent. Stakes anchor the tent to the ground, while guy lines provide extra stability by attaching to the tent’s frame. Pegs are used to tighten the fabric and ensure a snug fit. Properly driving stakes at a 45-degree angle and tightening guy lines will ensure your tent remains stable in windy conditions. Always choose stakes suitable for the ground type, and use pegs to secure loose ends for a taut and weatherproof setup.
Installing Vestibules or Awnings
Vestibules and awnings provide additional storage space and weather protection for your tent. To install them, attach the vestibule or awning to the designated points on the tent frame using clips or hooks. Ensure proper alignment with the tent’s doors or sides. Secure the structure with stakes and guy lines, tightening firmly to prevent sagging. For awnings, extend the poles and anchor them to the ground. Proper installation enhances ventilation, storage, and overall camping comfort while maintaining the tent’s structural integrity and weather resistance.
Mastery of tent setup ensures a safe and enjoyable camping experience. Always prioritize safety, follow guidelines, and practice assembly to achieve a successful and stress-free outdoor adventure.
Final Tips for a Successful Camping Experience
Practicing tent setup at home ensures confidence during your trip. Always check weather forecasts and pack accordingly. Bring spare stakes and repair kits for emergencies. Organize gear inside the tent to maximize space and accessibility. Keep the tent clean and dry to prevent mold and damage. Lastly, familiarize yourself with the campsite rules and respect nature. These tips will enhance your camping experience, ensuring safety, comfort, and memorable adventures in the great outdoors.
Importance of Practicing Tent Setup
Practicing tent setup at home is crucial for a smooth camping experience. It helps you understand the instructions, identify potential challenges, and develop muscle memory for assembly. Regular practice reduces setup time and minimizes stress during trips. Familiarizing yourself with the poles, stakes, and fabric ensures you can assemble the tent efficiently, even in challenging conditions. Additionally, practice helps verify that all parts are included and functional, preventing issues in the field. Regular practice keeps your tent in good condition and ensures it remains a reliable shelter.